Sunday 31 March 2013

Project Components

src – your source code
gen – auto-generated code (usually just R.java)
libs - Included  libraries
Resources
Drawables (like .png images)
Layouts
Values (like strings)
Manifest file

SRC(Contains Source Code)

In Android Development the src folder is where all you put your main Java code
EX. MainActivity.Java


XML

Used to define some of the resources
Layouts (UI)
Strings
Manifest file
Shouldn’t usually have to edit it directly, Eclipse can do that for you
Preferred way of creating UIs
Separates the description of the layout from any actual code that controls it
Can easily take a UI from one platform to another


R Class

Auto-generated: you shouldn’t edit it
Contains IDs of the project resources
Enforces good software engineering
Use findViewById and Resources object to get access to the resources
Ex. Button b = (Button)findViewById(R.id.button1)
Ex. getResources().getString(R.string.hello));


 Layout


Eclipse has a great UI creator
Generates the XML for you
Composed of View objects
Can be specified for portrait and landscape mode
Use same file name, so can make completely different UIs for the orientations without modifying any code.


Strings


 In res/values
strings.xml
Application wide available strings
Promotes good software engineering
UI components made in the UI editor should have text defined in strings.xml
Strings are just one kind of ‘Value’ there are many others

Menifest File

Contains characteristics about your application
When have more than one Activity in app, NEED to specify it in manifest file
Go to graphical view of the manifest file
Add an Activity in the bottom right
Browse for the name of the activity
Need to specify Services and other components too
Also important to define permissions and external libraries, like Google Maps API

Drawables

A Drawable resource is a general concept for a graphic which can be drawn. The simplest case is a graphical file, which would be represented in Android via a BitmapDrawable class. Bitmaps are typically stored in one of theres/drawable folders. The Android project creation wizard creates several of these folders by default, you can provide different sized files for different resolutions of Android devices. If you only provide one file for all sizes the Android system will scale the resource.

In additional to graphical files, Android supports XML drawables and 9-patch graphics. XML drawables are used to describe shapes (color, border, gradient), State and Transitions and more.
9-patch graphics are used to define which part of a graphic should be stretched if the View which uses this graphic is larger than the graphic.

Libs

The /lib folder is used to import library files in project that executables make use of and also you can import third party library files .


Saturday 30 March 2013


Get Started Developing for Android with Eclipse


Installing Eclipse and the Android SDK

The recommended environment for developing Android applications is Eclipse with the Android Development Toolkit (ADT) plugin installed. I’ll discuss the process here. If you need more detail, Google’s own developer pages do a good job of explaining the installation and configuration process.
  • Download the Android SDK for your platform (Windows, Mac OS X, or Linux).
  • Extract the downloaded file to somewhere on your hard drive (on Linux, I use /media/a).
  • If you don’t already have Eclipse installed, download and install the Eclipse IDE for Java Developers package. For programming, Google recommends using Eclipse 3.5 (Galileo).
  • Run Eclipse and choose Help->Install New Software.
  • Click Add in the Available Software window.
  • Enter Android Development Tools in the Name field, and https://dl-ssl.google.com/android/eclipse/ in the Location field.
  • Click OK and check Developer Tools in the list of available software. This will install the Android Development Tools and DDMS, Android’s debugging tool.


Click Next and Finish to install the plugin. You’ll need to restart Eclipse once everything is installed.
  • When Eclipse restarts, choose Window->Preferences and you should see Androidlisted in the categories.
You now need to tell Eclipse where you’ve installed the Android SDK. Click Androidand then Browse to select the location where you extracted the SDK files. For example,
/media/a/android-sdk-linux.


  • Click OK to have Eclipse save the location of your SDK.

Android virtual device - Emulator


What is the Android Emulator?


The Android Development Tools (ADT) include an emulator to run an Android system. The emulator behaves like a real Android deviceIin most cases) and allows you to test your application without having a real device. 
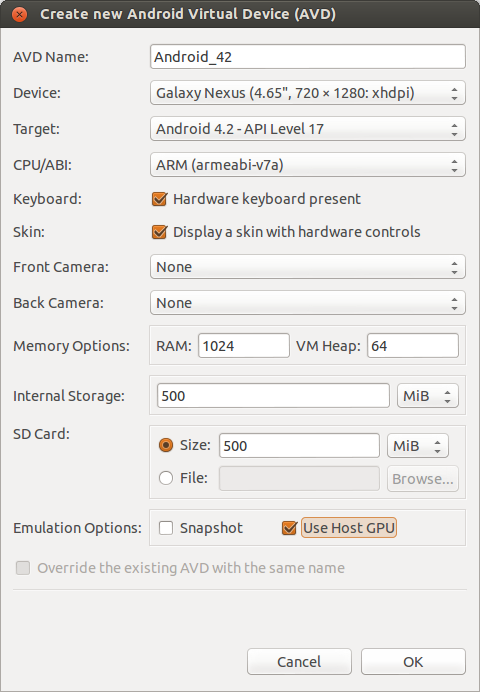
You can configure the version of the Android system you would like to run, the size of the SD card, the screen resolution and other relevant settings. You can define several of them with different configurations.These devices are called Android Virtual Device and you can start several in parallel.

Emulator Shortcuts

The following shortcuts are useful for working with the emulator.
Alt+Enter Maximizes the emulator. Nice for demos.
Ctrl+F11 changes the orientation of the emulator.
F8 Turns network on / off.

Emulator Parameter

There are lots of parameters, we can set while creating android virtual device(AVD). 
The graphics of the emulator can use the native GPU of the computer. This makes the rendering in the emulator very fast. To enable this, add the GPU Emulation property to the device configuration and set it to true.
You can also set the Enabled flag for Snapshots. This will save the state of the emulator and will let it start much faster. Unfortunately currently native GPU rendering and Snapshots do not work together.


Get you start in Android programming

In this tutorial, we show you how to create a simple “hello world” Android project in Eclipse IDE + ADT plugin, and run it with Android Virtual Device (AVD). The Eclipse ADT plugin provided easy Android project creation and management, components drag and drop, auto-complete and many useful features to speed up your Android development cycles.

Create Android Project


In Eclipse, select “File -> New -> Project….”, “Android Project”, and input your application detail. Eclipse will create all the necessary Android project files and configuration.


Hello World

Locate the generated activity file, and modify a bit to output a string “Hello World”.
File : MainActivity.java

package com.learnsimply.helloworld;

import android.os.Bundle;
import android.app.Activity;
import android.view.Menu;
import android.widget.TextView;

public class MainActivity extends Activity {
/** Called when the activity is first created. */

@Override
public void onCreate(Bundle savedInstanceState) {
super.onCreate(savedInstanceState);
setContentView(R.layout.activity_main);
TextView text = (TextView)findViewById(R.id.txtView);
text.setText("Hello World");
}

}


File : activity_main.xml


<LinearLayout xmlns:android="http://schemas.android.com/apk/res/android"
xmlns:tools="http://schemas.android.com/tools"
android:layout_width="match_parent"
android:layout_height="match_parent" >

<TextView
android:id="@+id/txtView"
android:layout_width="wrap_content"
android:layout_height="wrap_content"
tools:context=".MainActivity" />

</LinearLayout>


Running Your Application

Now let’s try running the application in Eclipse. As this is the first run, Eclipse will ask what type of project you are working on:
  • Choose Run->Run or press Ctrl+F11.
  • Choose Android Application and click OK.
Eclipse will now try to run the application on an Android device. At the moment, though, you don’t have any Android devices running, so the run will fail and you’ll be asked to create a new Android Virtual Device (AVD).


Now create fresh android virtual device and test your application output.


Now Run your application and see output


What is Android?


What is Android?

Android is a Linux-based operating system designed primarily for touchscreen mobile devices such as smartphones and tablet computers. Initially developed by Android, Inc., which Google backed financially and later bought in 2005.

The Android Software Development Kit (Android SDK) provides all necessary tools to develop Android applications. This includes a compiler, debugger and a device emulator, as well as its own virtual machine to run Android programs.

Android allows background processing, provides a rich user interface library, supports 2-D and 3-D graphics using the OpenGL libraries, access to the file system and provides an embedded SQLite database.

WHY ANDROID ?

Simple and Powerfull SDK
No licensing,distribution,or development fees
Development over many platform
Linux,Mac OS,Windows
Excellent documentation

  For us

  Java-based, easy to import 3 rd party Java library
  Job opportunity


ANDROID SDK FEATURE

 GSM, EDGE, and 3G networks, WiFi , Bluetooth
 API Support for Bluetoothe , WiFi Ad hoc mode

Libraries
Media, SQLite , WebKit, SSL

Hardware control:
Accelerometer, compass, microphone, camera, GPS
touch screen, power Location-based service, map (Google API)


Google Play (Android Market)


Google offers the Google Play service in which programmers can offer their Android application to Android users. Google phones include the Google Play application which allows to install applications.
Google Play also offers an update service, e.g. if a programmer uploads a new version of his application to Google Play, this service will notify existing users that an update is available and allow to install it.
Google Play used to be called Android Market.