Get Started Developing for Android with Eclipse
Installing Eclipse and the Android SDK
The
recommended environment for developing
Android applications is
Eclipse with the Android Development Toolkit (ADT) plugin installed.
I’ll discuss the process here. If you need more detail, Google’s
own developer
pages do
a good job of explaining the installation and configuration process.
- Download the Android SDK for your platform (Windows, Mac OS X, or Linux).
- Extract the downloaded file to somewhere on your hard drive (on Linux, I use /media/a).
- If you don’t already have Eclipse installed, download and install the Eclipse IDE for Java Developers package. For programming, Google recommends using Eclipse 3.5 (Galileo).
- Run Eclipse and choose Help->Install New Software.
- Click Add in the Available Software window.
- Enter Android Development Tools in the Name field, and https://dl-ssl.google.com/android/eclipse/ in the Location field.
- Click OK and check Developer Tools in the list of available software. This will install the Android Development Tools and DDMS, Android’s debugging tool.

Click Next and Finish to
install the plugin. You’ll need to restart Eclipse once everything
is installed.
- When Eclipse restarts, choose Window->Preferences and you should see Androidlisted in the categories.
You
now need to tell Eclipse where you’ve installed the Android SDK.
Click Androidand
then Browse
to
select the location where you extracted the SDK files. For example,
/media/a/android-sdk-linux.
/media/a/android-sdk-linux.

- Click OK to have Eclipse save the location of your SDK.
Android virtual device - Emulator
What is the Android Emulator?
The Android Development Tools (ADT) include an emulator to run an Android system. The emulator behaves like a real Android deviceIin most cases) and allows you to test your application without having a real device.
You can configure the version of the Android system you would like to run, the size of the SD card, the screen resolution and other relevant settings. You can define several of them with different configurations.These devices are called Android Virtual Device and you can start several in parallel.
Emulator Shortcuts
The
following shortcuts are useful for working with the emulator.
Alt+Enter
Maximizes
the emulator. Nice for demos.
Ctrl+F11
changes
the orientation of the emulator.
F8
Turns
network on / off.
Emulator Parameter
There
are lots of parameters, we can set while creating android virtual
device(AVD).
The
graphics of the emulator can use the native GPU of the computer. This
makes the rendering in the emulator very fast. To enable this, add
the
GPU
Emulation
property
to the device configuration and set it to true.
You
can also set the
Enabled flag
for Snapshots. This will save the state of the emulator and will let
it start much faster. Unfortunately currently native GPU rendering
and Snapshots do not work together.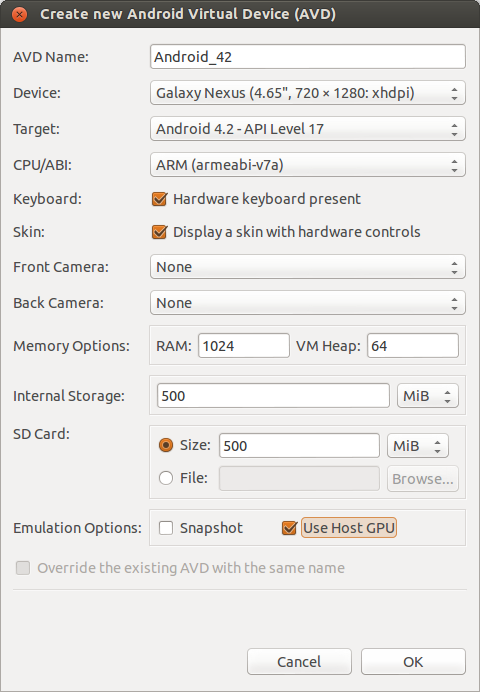
Get you start in Android programming
In
this tutorial, we show you how to create a simple “hello
world” Android project
in Eclipse
IDE + ADT plugin,
and run it with Android
Virtual Device (AVD).
The Eclipse ADT plugin provided easy Android project creation and
management, components drag and drop, auto-complete and many useful
features to speed up your Android development cycles.
Create Android Project
In
Eclipse, select “File -> New -> Project….”, “Android
Project”, and input your application detail. Eclipse will create
all the necessary Android project files and configuration.


Hello World
Locate
the generated activity file, and modify a bit to output a string
“Hello World”.
File
: MainActivity.java
package
com.learnsimply.helloworld;
import
android.os.Bundle;
import
android.app.Activity;
import
android.view.Menu;
import
android.widget.TextView;
public
class
MainActivity extends
Activity {
/**
Called when the activity is first created. */
@Override
public
void
onCreate(Bundle savedInstanceState) {
super.onCreate(savedInstanceState);
setContentView(R.layout.activity_main);
TextView text =
(TextView)findViewById(R.id.txtView);
text.setText("Hello
World");
}
}
File : activity_main.xml
<LinearLayout
xmlns:android="http://schemas.android.com/apk/res/android"
xmlns:tools="http://schemas.android.com/tools"
android:layout_width="match_parent"
android:layout_height="match_parent"
>
<TextView
android:id="@+id/txtView"
android:layout_width="wrap_content"
android:layout_height="wrap_content"
tools:context=".MainActivity"
/>
</LinearLayout>
Running Your Application
Now
let’s try running the application in Eclipse. As this is the first
run, Eclipse will ask what type of project you are working on:
-
Choose
Run->Run
or
press Ctrl+F11.
-
Choose
Android
Application and
click OK.
Eclipse
will now try to run the application on an Android device. At the
moment, though, you don’t have any Android devices running, so the
run will fail and you’ll be asked to create a new Android
Virtual Device (AVD).

Now
create fresh android virtual device and test your application output.

Choose
Run->Run
or
press Ctrl+F11.
Choose
Android
Application and
click OK.
Now Run your application and see output

No comments:
Post a Comment